White Background to Lifestyle: Transforming Basic Product Photos with AI
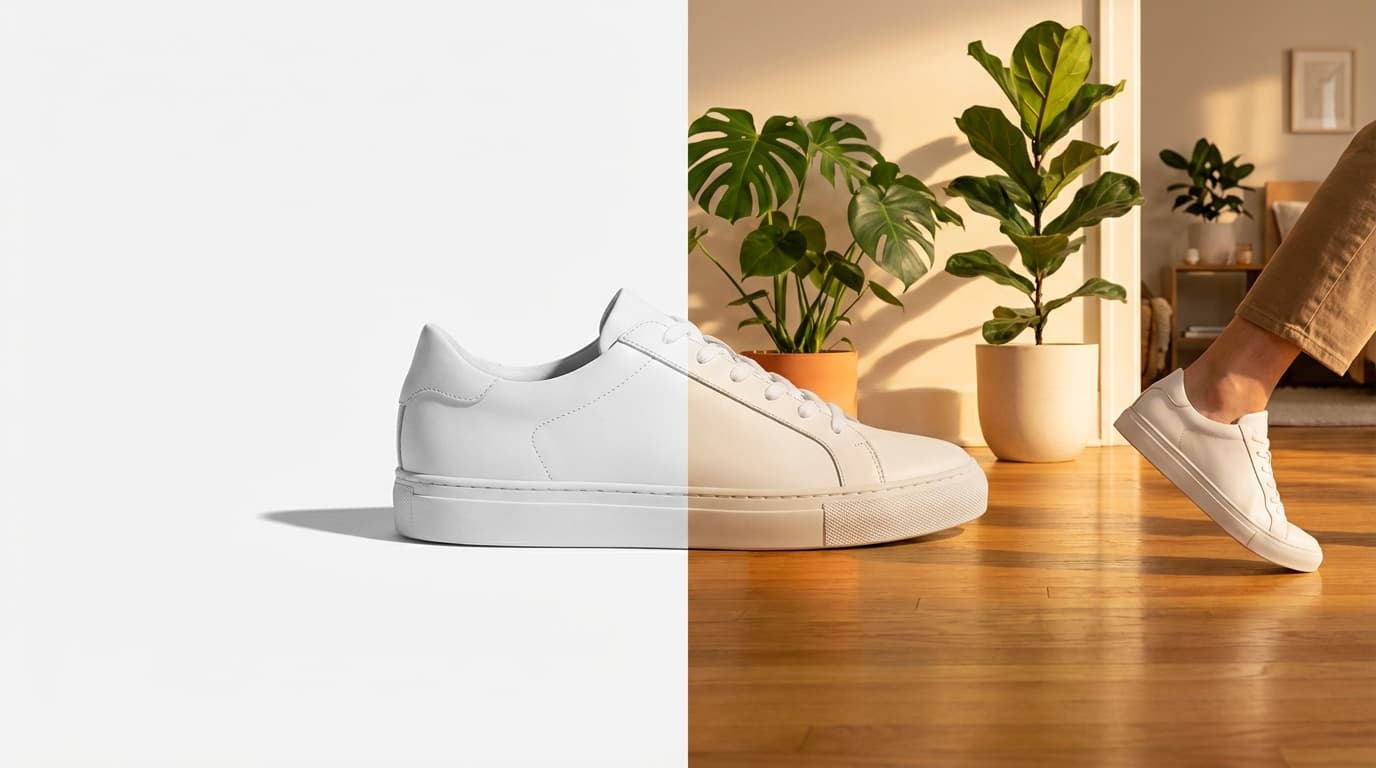
To turn a plain product-on-white shot into lifestyle imagery with AI, run it through five steps: clean the cutout with Remove Background, set the mood with Relight to match your target scene, composite it into a setting with Recreate, generate a few scene variants, then Upscale the final selects. The AI handles perspective matching, shadow generation, and lighting integration automatically — collapsing a separate lifestyle photoshoot into about fifteen minutes per product, with no locations, props, or photographer required.
Step 1: Clean Up the Source Image
Start with the best version of your white background shot. If the background isn't perfectly clean, run it through Remove Background to get a crisp cutout with transparent edges. This gives every downstream tool the cleanest possible input.
Check the edges at full zoom. Hair-thin artifacts around the product will show up in the final lifestyle image, so catch them now.
Step 2: Fix the Lighting
White background photos are usually shot under flat, even studio lighting. That's great for accuracy but terrible for mood. Use the Relight tool to shift the lighting before compositing.
For lifestyle scenes, you typically want:
- Warm side lighting for cozy, indoor scenes (living rooms, kitchens, cafes)
- Bright overhead light for outdoor or daytime scenes
- Dramatic rim lighting for premium or editorial looks
Match the lighting direction to the scene you're planning. If your lifestyle scene has light coming from the left, relight the product with left-side lighting.
Step 3: Place the Product in a Scene
This is where the transformation happens. Upload your clean, relit product to Recreate along with a scene image or description.
Good scene choices by product type:
- Drinkware and kitchen products — Morning kitchen counter with coffee, breakfast spread
- Skincare — Marble bathroom shelf, vanity with soft towels
- Tech accessories — Minimalist desk setup, coffee shop table
- Outdoor gear — Trail path, campsite, park bench
- Home decor — Styled living room shelf, bedside table
The AI handles perspective matching, shadow generation, and lighting integration automatically.
Step 4: Generate Variants
One product, one scene is a starting point — but the real value is generating multiple variants quickly. Try:
- Different scenes for the same product (3-5 contexts per SKU is a good target)
- Different times of day in outdoor scenes (morning light vs. golden hour)
- Different styling by adjusting the prompt (minimalist vs. cluttered, modern vs. rustic)
This gives you a library of lifestyle images for A/B testing on your listings, social media posts, and ad creatives.
Step 5: Upscale for Final Delivery
AI-generated lifestyle images are good, but they may not meet the resolution requirements for every platform. Run your final selects through Upscale as the last step.
Always upscale last. Editing an already-upscaled image wastes the resolution boost.
The Complete Pipeline
Here's the full sequence:
- Remove Background — Clean cutout from white-bg photo
- Relight — Adjust lighting to match target scene
- Recreate — Place product into lifestyle scene
- Review and iterate — Try multiple scenes and prompts
- Upscale — Boost resolution for final delivery
What used to take a half-day shoot and a week of post-production now takes about 15 minutes per product. The economics change completely when lifestyle imagery costs nearly nothing to produce — you can afford to give every SKU the lifestyle treatment, not just your top sellers.
For more on building efficient workflows at scale, see our guide on the complete AI image workflow for e-commerce.